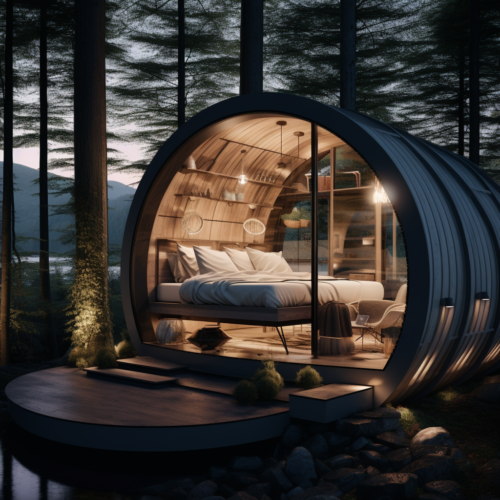
For the purpose of this example we are imagining you are building a 1 bed pod, with kitchen, toilet & shower. The layout of the pod will depend on your site. I’ve included some top tips to consider before you start with the pod.
The 8 Steps To Success!
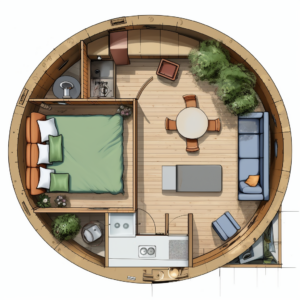
Design and Planning:
- Determine the size and layout of the glamping pod, considering the dimensions required for the bedroom area, kitchen area, toilet, shower, seating area, and decking.
- Sketch out a floor plan, ensuring efficient use of space and easy flow between different areas.
- Consider insulation materials and techniques suitable for your climate to ensure energy efficiency and comfort.
- Tip: It is really important to take your time on this stage. Think about where the plumbing and elections will come in. Think about the view and the layout of the site if you are adding other lodges.
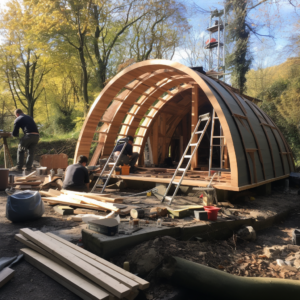
Foundation and Base:
- Prepare the foundation, which could be a concrete slab or concrete footings, depending on the soil and local building codes.
- Build the base structure using pressure-treated timber or steel beams, ensuring it is level and sturdy.
Walls and Roof:
- Frame the walls with timber or steel studs, leaving spaces for windows and doors.
- Insulate the walls using suitable insulation materials, such as foam boards or mineral wool.
- Install exterior cladding of your choice, such as wood siding or weatherproof panels.
- Construct the roof, ensuring it provides proper insulation and waterproofing.
- Tip: Think about how the pod will fit in with its surroundings. Natural woods work well in most locations.
Plumbing and Electrical:
- Design and install the plumbing system, including a small kitchen sink, toilet, and shower. Consult with a professional plumber to ensure compliance with local codes.
- Plan the electrical layout, including lighting, outlets, and connections for appliances. Hire a licensed electrician for this task.
- Tip: Think about low level lighting by the beds for reading. Go for softer lighting for a more relaxing affect.
Interior Finishing: Install interior walls, if necessary, to divide the different areas.
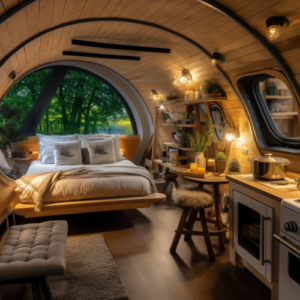
- Install flooring, which could be laminate, vinyl, or hardwood, depending on your preference.
- Build and install the kitchen area, including cabinets, countertops, and appliances.
- Construct a seating area with appropriate seating and storage options.
- Set up the bedroom area with a bed, wardrobe, and any additional furniture.
- Tip: Always remember to make as much storage as possible so people can hide away their luggage after they have unpacked.
Insulation and Heating:
- Insulate the floor, walls, and roof using high-quality insulation materials to ensure proper heat retention and energy efficiency.
- Install a log burner or wood stove in a safe and well-ventilated location, following all safety guidelines and regulations. This must has a gas safe certificate in the UK.
Exterior Features:
- Build a front decking area using suitable materials like wood or composite decking boards. Think about having extra patio areas or covered seating outside to maximise the use of the space what ever the weather. The side of the pod is a great area for extra seating or an outdoor sofa and is often overlooked.
- Add exterior finishes, such as painting or staining the cladding and applying weatherproofing treatments.
- Tip: Think about the journey from the car park to the pod. In my experience it is best to have a stone path for this.
Finishing Touches:
- Decorate the interior to create a cozy and inviting space, incorporating glamping-style elements.
- Install lighting fixtures, curtains or blinds, and any necessary plumbing fixtures.
- Tip: Install good quality blackout blinds on the windows – no one wants blazing sunshine at 5am. This will also help keep the pod cooler in the summer.
Remember that construction projects can be complex and require various skills. It’s advisable to consult with professionals, including architects, contractors, plumbers, and electricians, to ensure safety, compliance with local regulations, and high-quality construction.
If you have the skills it is worth creating something that is unique to your site. Rows and rows of the same pre built pods will never get the same reaction as unique places to stay. If you can build it to stand out then do!